Few things affect the curb appeal of a freshly painted home faster than tannin bleeding. You may notice yellowish, reddish-brown, or dark tea-colored streaks spreading across your exterior cedar siding even after the surface has been painted.
Tannin bleed-through is one of the most common and frustrating challenges homeowners face with real wood siding. However, these stains do not always mean your cedar is ruined or that the siding needs to be replaced.
If you understand how cedar extractives move through coatings, you can treat the root cause, clean the discoloration, seal the wood correctly, and reduce the risk of stains coming back. This guide explains how to fix tannin bleed on cedar siding and how to protect the finish with the right preparation, primer, and paint system.
If you are planning a full repaint, it also helps to understand the basics of painting cedar wood siding before treating tannin stains.
What Exactly Is Tannin Bleeding?

Tannins are naturally occurring water-soluble compounds found inside wood species like cedar and redwood. These organic extractives are part of what gives cedar its natural color, character, and resistance to decay.
But when cedar is used as exterior siding, those same tannins can become a cosmetic problem. When moisture enters the wood, it can dissolve the tannins and carry them toward the surface. As the moisture evaporates, the brown, yellow, or reddish pigments may remain on or under the paint film.
Tannin bleeding usually happens through this process:
- Moisture Infiltration: Rain, humidity, washing, leaks, or trapped moisture enters the cedar fibers.
- Dissolution: The water dissolves tannins inside the wood.
- Migration: As the cedar dries, moisture moves outward through the wood by capillary action.
- Evaporation: The water evaporates, leaving tannin stains behind on or near the painted surface.
This is why tannin bleed is often connected to moisture, poor primer selection, or painting cedar before it is fully dry.
Root Causes: Why Is Your Cedar Siding Bleeding?
If you simply paint over tannin stains without fixing the cause, the discoloration may return. To properly repair the issue, you need to understand why the tannins are reaching the surface.
Common causes include:
- Painting raw cedar without a standalone stain-blocking primer
- Using the wrong type of primer
- Applying water-based paint directly over bare cedar
- Painting cedar while it is still damp
- Moisture trapped behind the siding
- Heavy rain before primer or paint cures
- Leaking gutters or downspouts
- Failed caulking around trim or windows
- Aggressive pressure washing
- Weathered, gray, or porous cedar boards
- Skipping primer on scraped bare wood patches
If the cedar was painted while damp, trapped moisture can also contribute to peeling, bubbling, or coating failure. This is one common reason why paint peels on cedar siding.
Step 1: Fix Exterior Moisture Sources First
Tannins need moisture to move. If water is actively entering the cedar or getting trapped behind the siding, stain repairs may fail again.
Before treating the stains, inspect the exterior carefully. Check for:
- Leaking gutters and damaged downspouts
- Sprinklers hitting the siding directly
- Roofline leaks or poor flashing details
- Failed caulking around windows
- Open joints near trim boards
- Water collecting near lower siding boards
- Damp shaded areas that never dry properly
If you find gaps around trim or windows, remove failed caulk and replace it with high-quality exterior sealant where appropriate. For a full surface preparation process, see how to prep cedar siding before painting.
Primer can help block stains, but it cannot solve active water intrusion. Fix the moisture source first.
Step 2: Wash and Treat Existing Tannin Stains
Do not immediately sand or scrape active tannin streaks. In many cases, the stain should first be washed and treated so the discoloration is removed from the surface before priming. The goal is to clean the siding without damaging the cedar fibers.
Method A: Oxalic Acid Wood Brightener
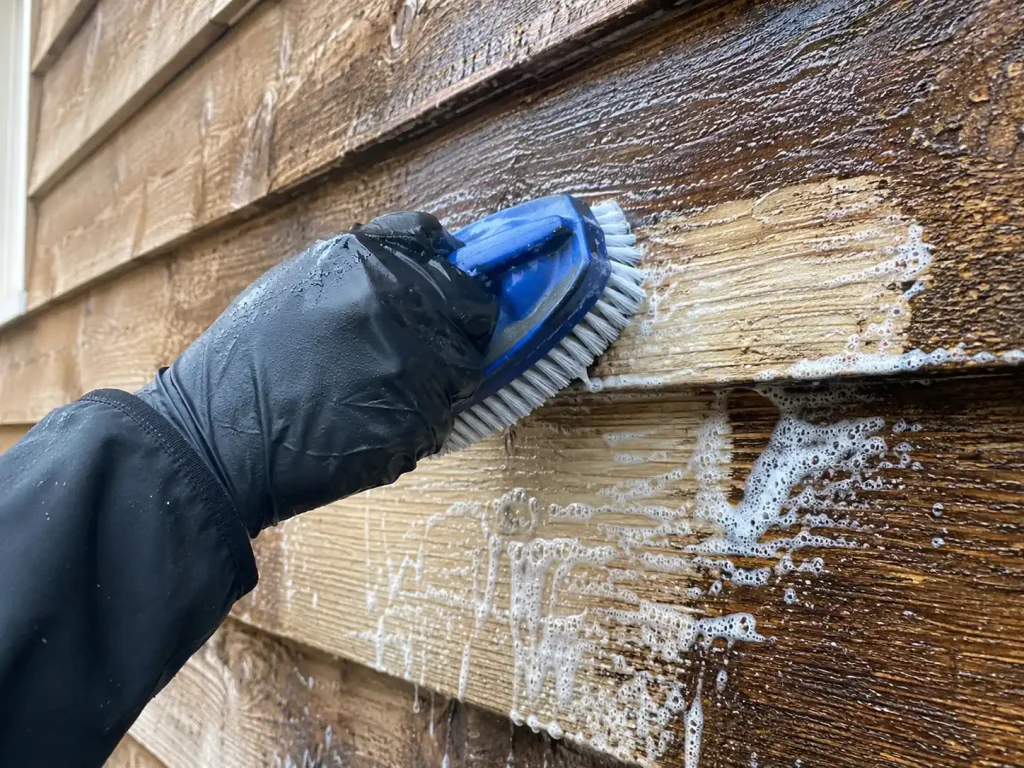
Oxalic acid is commonly used as a wood brightener and stain remover for tannin-related discoloration. It can help break down brown or yellow wood extractive stains without aggressively damaging the cedar surface when used correctly.
Follow the product label carefully, but the general process is:
- Mix the oxalic acid or wood brightener according to the manufacturer’s instructions.
- Wear safety goggles, chemical-resistant gloves, long sleeves, and proper protection.
- Apply the solution to the stained area with a nylon or polyester scrub brush.
- Scrub gently with the direction of the wood grain.
- Let the solution dwell for the recommended time, usually around 10–15 minutes.
- Do not allow the cleaner to dry completely on the wall.
- Rinse thoroughly with clean water from a garden hose.
Avoid steel wire brushes because they can leave metal particles behind and create additional staining.
Method B: Commercial Wood Cleaners
If you do not want to mix oxalic acid crystals, use a commercial exterior wood cleaner or deck brightener designed for tannin stains or cedar restoration.
Choose a product labeled for:
- Exterior wood care
- Cedar or redwood surfaces
- Tannin stains and stain removal
- Wood brightening
Always test in a small hidden area first, and follow the manufacturer’s safety and rinsing instructions.
Step 3: Allow the Cedar to Dry Fully
After washing, the cedar must dry completely before primer is applied. If the siding is still damp, remaining tannins can reactivate, and the new coating may fail.
Let the siding dry during clear weather. Depending on humidity, shade, temperature, and siding condition, cedar may need more than one day to fully dry.
For best results, use a pin-type digital moisture meter. A common target before priming or painting cedar siding is below 12% moisture content.
Test several areas, especially:
- Shaded walls and lower siding boards
- Areas near landscaping and around windows
- Sections near rooflines and previously stained areas
- Boards that were heavily washed during cleaning
Do not rely only on touch. Cedar can feel dry on the surface while still holding high moisture levels inside the fibers.
Step 4: Lightly Sand or Scuff the Area
Once the cedar is clean and dry, inspect the stained area. If the surface is rough, glossy, raised, or uneven, light sanding can help create a better bonding surface for primer. Sand only as much as needed to smooth the area and remove loose material.
Focus on:
- Raised grain or rough bare wood fibers
- Uneven paint edges (feather sanding)
- Glossy old coating or stained bare spots
- Flaking or unstable coating patches
After sanding, remove all dust with a brush, cloth, or blower before applying primer.
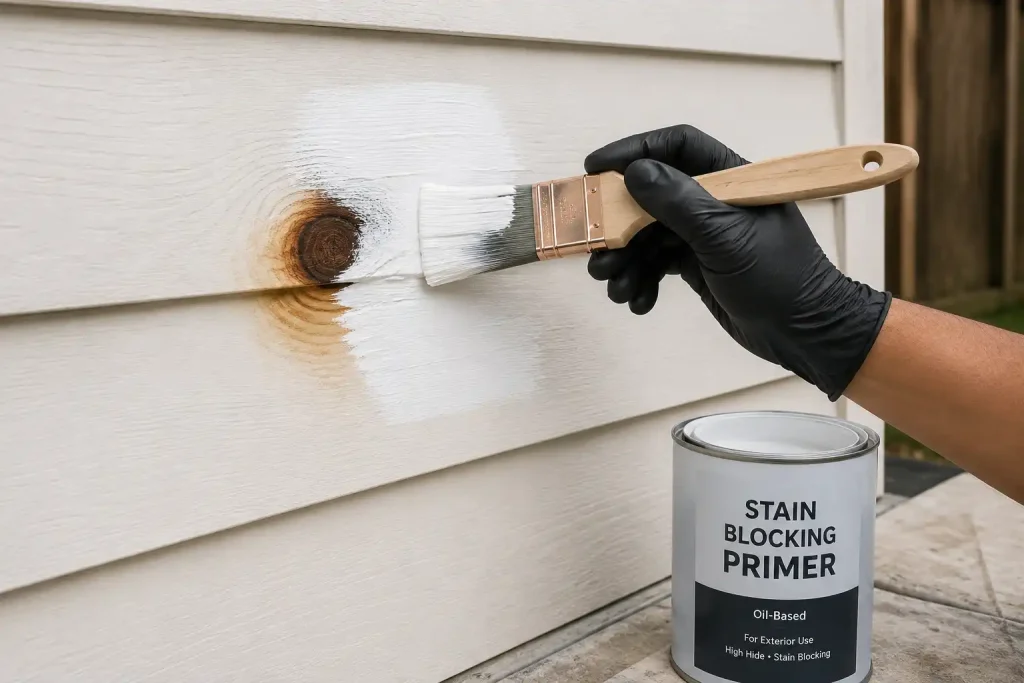
Step 5: Apply a Heavy-Duty Stain-Blocking Primer
This is the most important step in fixing tannin bleed. Regular paint alone is not enough to stop tannins. You need a dedicated stain-blocking exterior primer that is suitable for cedar or redwood.
Look for a primer labeled for:
- Exterior wood protection
- Stain blocking and tannin containment
- Bare wood sealing
- Strong adhesion and topcoat compatibility
Oil-Based Primer for Cedar Tannin Bleed
Oil-based exterior wood primer is often one of the strongest options for sealing tannin-prone cedar. Because cedar tannins are water-soluble, an oil-based primer can create a strong stain-blocking barrier over the raw wood pores.
Oil-based primer is especially useful for bare cedar patches, weathered boards, knots, severe tannin stains, and areas where old paint was scraped down to raw wood.
High-Quality Acrylic Stain-Blocking Primer
Some premium water-based acrylic primers are also formulated to block stains and tannins. These can be useful when local VOC rules, odor concerns, or project requirements make oil-based primer less practical. However, do not use a basic latex primer unless it is clearly rated for tannin blocking on exterior wood.
If you are unsure which primer and topcoat combination to use, see our guide on the best exterior paint for cedar siding.
Spot Priming vs. Full Priming
Spot Priming
If tannin bleed is limited to a few knots, streaks, or small patches, spot-prime those areas generously. Overlap the stained area slightly so the primer seals beyond the visible discoloration.
Full Priming
If tannin bleed is widespread, or if the cedar is heavily weathered, prime the full board or full wall section. This usually creates a more even surface and reduces the chance of visible patchiness after painting.
In severe cases, a second primer coat may be needed. If stains appear through the first primer coat, allow it to dry fully and apply another coat before painting.
Step 6: Let the Primer Cure Properly
Do not rush the topcoat. Primer needs enough time to dry and form a proper barrier. Before applying paint, make sure the primer is fully dry, firmly bonded, not tacky, and even in appearance. It must show zero active stain bleed coming through the primer layer.
Drying time depends on the product, weather, humidity, and cedar condition. Always follow the primer manufacturer’s instructions. If stain still appears after the first primer coat, do not paint over it yet. Apply another coat of stain-blocking primer first.
Step 7: Apply Your Premium Topcoat
Once the stain-blocking primer has cured properly, apply a high-quality exterior paint. For most cedar siding projects, premium 100% acrylic latex exterior paint is a strong choice because it stays flexible and performs well on exterior wood surfaces.
For best results:
- Use high-quality, exterior-grade acrylic latex paint.
- Apply two thin, even coats when recommended by the manufacturer.
- Avoid painting in harsh direct sun or right before expected rain.
- Match the existing sheen and color code perfectly if executing touch-ups.
- Feather the edges of your brush strokes into the surrounding old paint smoothly.
If the repair area is large, repainting the full board or full wall section may look significantly better than patching only one small spot.
Tannin Bleed vs. Mildew: What’s the Difference?
Tannin bleed and mildew can look similar, but they are completely different problems and need entirely different fixes.
- Tannin Bleed Usually: Looks yellow, brown, reddish, or tea-colored. It comes from inside the cedar pores and is common around knots, end grain, and bare cedar patches. It requires an acid-based cleaning, drying, and a heavy stain-blocking primer.
- Mildew Usually: Looks black, green, gray, or dark and patchy. It grows organically on top of the surface film and is highly common in damp, shaded areas. It requires a proper bleach or mildewcide treatment before painting.
Identifying the stain correctly matters. Washing alone will not stop tannin bleed, and primer should never be applied over active mildew spores.
Can You Paint Over Tannin Bleed?
You can paint over tannin bleed only after the stain has been cleaned, dried, and sealed with the correct primer. If you apply regular paint directly over the stain, the discoloration will return through the new coating.
The correct process is:
- Find and fix active moisture sources.
- Clean or treat the tannin stain chemically.
- Let the cedar dry fully below 12% moisture.
- Sand or scuff the substrate surface if needed.
- Apply a high-quality stain-blocking primer.
- Apply a second primer coat if stains remain visible.
- Repaint with premium exterior acrylic paint.
Can Tannin Bleed Happen on Stained Cedar?
Yes. Tannin bleed can also happen on stained cedar siding, especially when moisture gets behind the film and pulls extractives out to the surface. It may appear as dark streaks, uneven discoloration, or blotchy patches.
If you are planning to switch from an old stain to a fresh paint system, tannin control is especially important. The surface must be clean, dry, sanded where needed, and sealed with the right primer. For the full transition process, see our complete guide: can you paint over stained cedar siding.
Should You Paint or Stain Cedar After Tannin Bleed?
If tannin bleed keeps returning due to severe wood aging, you may wonder whether paint or stain is the better finish option.
- Paint gives cedar siding a perfectly clean, uniform appearance and strong color coverage. However, its long-term success depends heavily on a solid base layer of standalone primer.
- Stain allows more of the wood texture and grain lines to show and may be easier to maintain in some situations since it wears down gradually, but it can still show extractive discoloration if the cedar is not prepared correctly.
If you are deciding between both options, compare wood stain vs. paint for cedar siding before refinishing your exterior walls.
Practical Checklist for Tannin Bleed Repairs
Before starting the restoration repair, ensure your tools pipeline includes:
- [ ] Active moisture leaks, gutter issues, or sprinkler overspray fixed.
- [ ] Exterior wood cleaner or oxalic-acid-based wood brightener.
- [ ] Safety goggles, chemical-resistant gloves, and long sleeves.
- [ ] Soft-bristle nylon scrub brush (no steel brushes).
- [ ] Garden hose with standard spray nozzle for rinsing.
- [ ] Digital pin-type moisture meter to check wood readiness.
- [ ] Medium and fine sandpaper for rough or glossy areas.
- [ ] Dedicated stain-blocking exterior wood primer.
- [ ] Premium exterior 100% acrylic latex paint.
- [ ] High-quality synthetic brushes or rollers.
- [ ] A dry weather window clear of rain for application.
Common Mistakes When Fixing Tannin Bleed
Avoid these common mistakes if you want your stain repair to last for years:
- Painting Directly Over the Stain: Regular paint will only dissolve the extractives and pull them right back to the surface.
- Using the Wrong Primer: Standard latex primers allow water-soluble tannins to float right through them. Use an exterior wood stain blocker.
- Priming Damp Cedar: Moisture trapped inside wood cells reactivates the tannins, causing the stain to return immediately.
- Ignoring Leaks: If water continues to enter behind the siding panels, the stain will come back regardless of primer quality.
- Scrubbing With Metal Brushes: Steel brushes leave fine metal particles behind that corrode and create ugly rust stains.
- Only Touching Up a Small Spot: Small touch-ups will flash or look uneven under sunlight. Repainting the full board produces a seamless look.
- Rushing Dry Times: Primer needs proper curing time to establish a stable chemical barrier before the topcoat goes on.
Does Fixing Tannin Bleed Increase Painting Cost?
Yes, tannin bleed remediation can increase the total project cost because it requires extra labor hours, specialized chemical cleaners, extra drying time, and dedicated stain-blocking primers.
The overall budget may increase when:
- Extractive stains are widespread across multiple walls.
- Multiple coats of heavy oil primer are needed for severe blocking.
- Underlying structural moisture repairs are required before painting.
- Old base paint is widely failing and needs deep scraping.
- Full siding boards or wall sections need to be completely recoated to avoid flashing.
For a full structural pricing breakdown, read our guide on the cost to paint cedar siding.
When to Call a Professional
Small, isolated tannin stains can often be repaired smoothly with standard cleaning, drying, priming, and repainting. But larger or repeated staining may require professional contracting help.
Consider calling a professional if:
- Stains continue to return after you have applied proper primer.
- The paint film is also widely peeling, blistering, or flaking away.
- Widespread moisture is actively trapped behind the siding panels.
- Large, multi-story sections of the home are heavily discolored.
- Siding boards feel soft, spongy, or structurally damaged by rot.
- The home was built before 1978 and may contain older lead-based paint layers.
Final Thoughts
Tannin bleed on cedar siding can look alarming, but it is usually fixable with the right process. The stain must be cleaned or treated, the cedar must be allowed to dry, and the affected area must be sealed with a true stain-blocking exterior wood primer before repainting.
Do not treat tannin bleed as only a surface stain. It is a structural signal that natural cedar extractives have moved through the coating, often because of moisture, missing primer, or the wrong coating system. Fix the moisture source, clean the siding, verify the wood is dry below 12%, prime correctly, and repaint with a compatible exterior coating. When each step is done properly, cedar siding can successfully return to a clean, even, professional-looking finish.
FAQs About Fixing Tannin Bleed on Cedar Siding
Can I just paint over tannin bleed stains?
No. If you apply paint directly over tannin stains without cleaning and sealing the surface with a dedicated stain-blocking primer, the water-soluble discoloration will return through the new wet coating as it dries.
What is the best chemical to remove wood tannin stains?
Oxalic acid wood brightener is commonly used to clean tannin-related stains on cedar. It chemically breaks down the extractive discoloration safely and should be rinsed thoroughly with a hose according to the product label.
What primer stops tannin bleed on cedar siding?
Use an exterior wood primer labeled specifically for stain blocking or tannin containment. Oil-based stain-blocking primers are one of the strongest options for raw or severely stained wood, while premium acrylic primers rated for tannin control can also work.
Will tannin bleed stop on its own over time?
It may reduce slightly over many years as the wood naturally weathers and exhausts its extracts, but it will not disappear quickly or evenly. For painted surfaces, proper chemical cleaning, drying, priming, and repainting are required.
Can I use a water-based primer to block tannin bleed?
Some advanced, high-quality water-based primers are specifically made for stain and tannin blocking. However, standard, basic latex primers are not enough for bare cedar wood. Always choose a product clearly rated for exterior wood tannin control.
Is tannin bleed a sign of rot?
Not always. Tannin bleed is primarily a cosmetic staining issue. However, if the wood boards feel soft, spongy, warped, or are constantly damp, you must inspect the framing for deeper moisture damage or rot.
Can pressure washing cause tannin bleed?
Yes. Aggressive pressure washing forces water deep into the porous cedar cells. If you apply your primer or paint before the siding fully dries out internally, those dissolved tannins will migrate to the surface and stain the coating.
Does paint-and-primer-in-one stop cedar tannins?
Usually not on raw, scraped, or stained cedar wood. Paint-and-primer-in-one products lack the heavy chemical blockades required to seal raw wood extractives. Always use a standalone stain-blocking primer over any bare wood patches.
