Cedar siding is valued for its natural durability, rich texture, and timeless exterior appearance. But even high-quality cedar needs careful preparation before it is painted. A smooth, long-lasting finish depends less on the paint itself and more on the condition of the surface underneath.
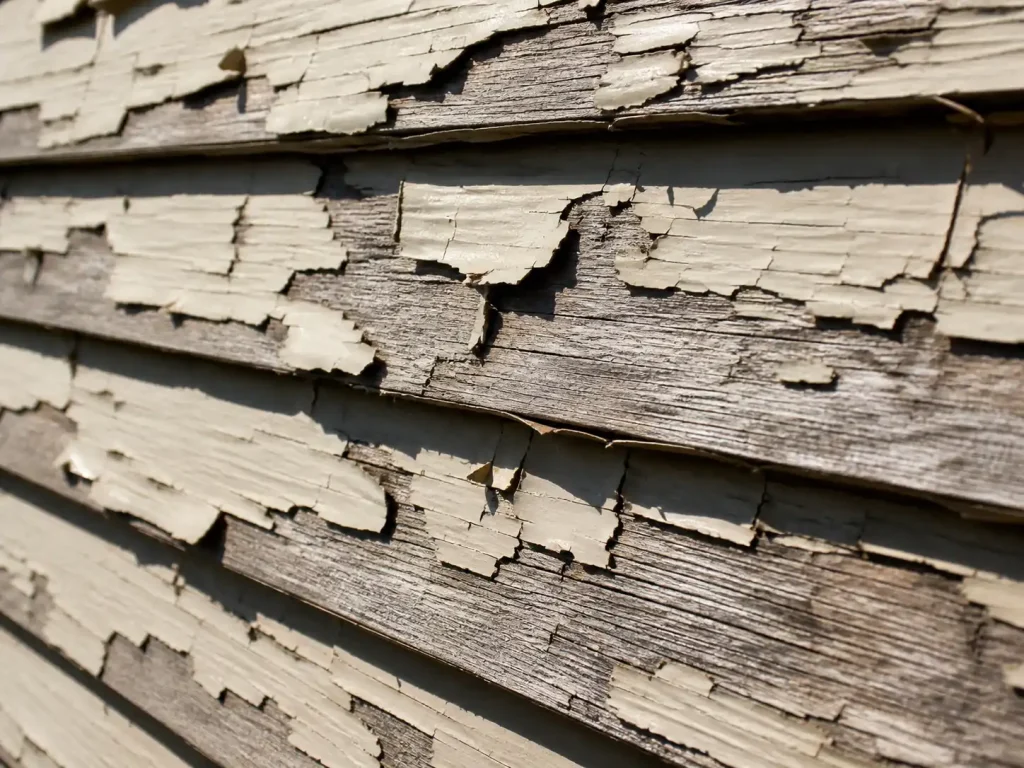
If cedar siding is dirty, damp, weathered, glossy, or covered with loose old paint, the new coating may not bond properly. That can lead to peeling, bubbling, cracking, tannin stains, and early paint failure.
Before painting cedar wood siding, the surface should be cleaned, dried, scraped, sanded, repaired, and properly prepared for primer. This guide explains how to prep cedar siding before painting so the final finish looks cleaner and lasts longer.
Why Cedar Siding Needs Careful Preparation
Cedar is a natural wood, which means it expands, contracts, absorbs moisture, and contains natural tannins. These characteristics make cedar beautiful, but they also make preparation more important.
Proper prep helps prevent:
- Poor paint adhesion
- Peeling or blistering paint
- Tannin bleed-through
- Rough or uneven finish
- Moisture-related paint failure
- Mildew returning under the coating
- Shorter paint lifespan
Many exterior paint problems are not caused by poor-quality paint. They happen because the siding was not properly cleaned, dried, sanded, repaired, or primed before painting.
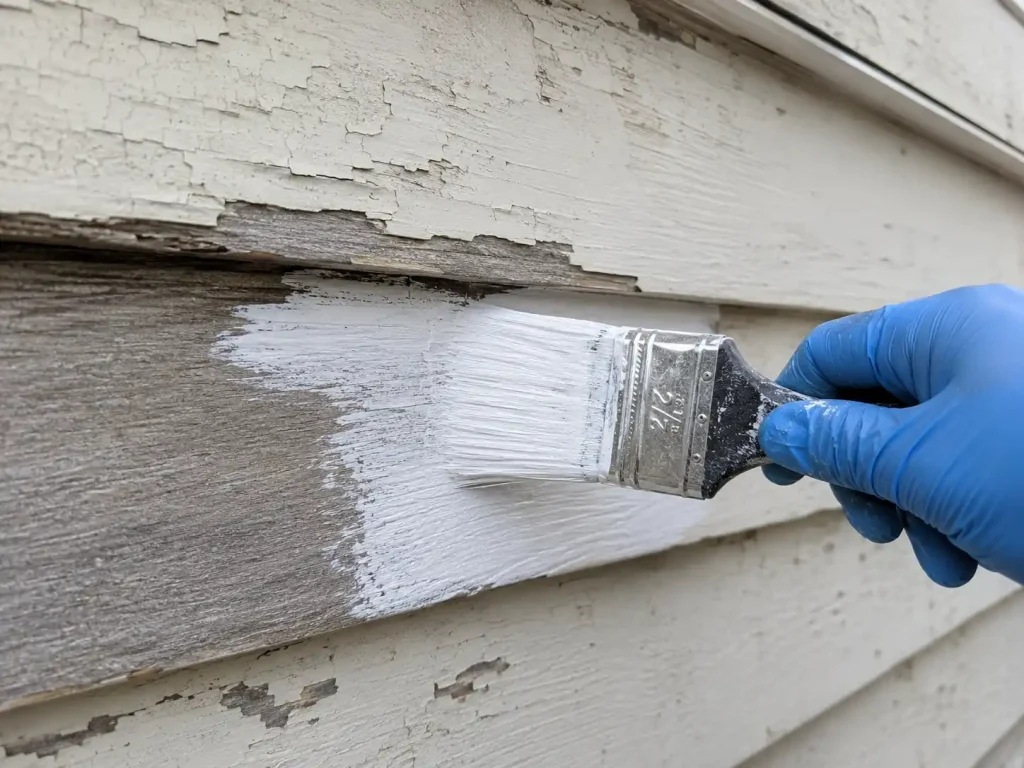
Phase 1: Remove Old, Loose, or Flaking Paint
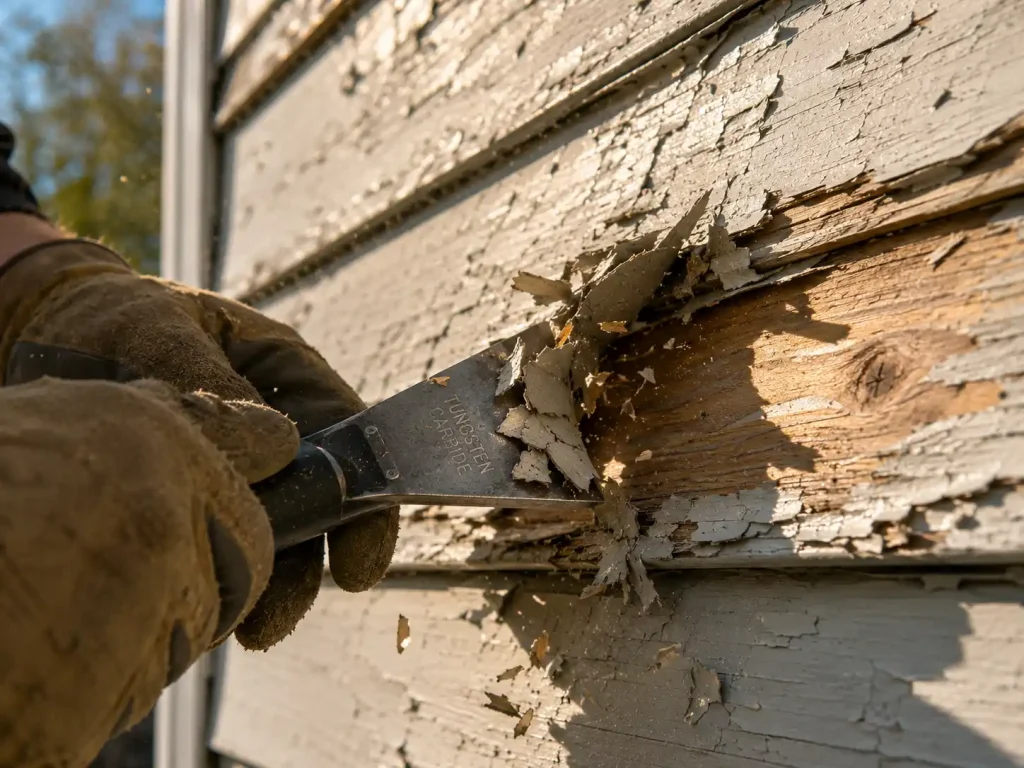
You cannot build a durable new finish over failing paint. If your cedar siding has existing layers of loose, chipped, or peeling coating, removal should be the first step.
Use a sharp paint scraper to remove loose or flaking paint. Work carefully with the wood grain so you do not gouge the cedar fibers. The goal is not always to strip the entire house down to bare wood, but any paint that is no longer firmly bonded must come off.
After scraping, sand the edges of the remaining paint so the transition between bare wood and old coating feels smooth. This process is called feather sanding, and it helps prevent visible ridges from showing through the new paint.
For heavy paint buildup, an exterior-grade wood stripper may be needed. This is more common on older homes with multiple paint layers.
Safety note: If the home was built before 1978, the existing paint may contain lead. Test before scraping or sanding, and use proper lead-safe procedures if lead is present.
Phase 2: Sand Rough and Weathered Areas
Sanding helps create a better bonding surface for primer and paint. It also removes rough fibers, surface glaze, and uneven edges left after scraping.
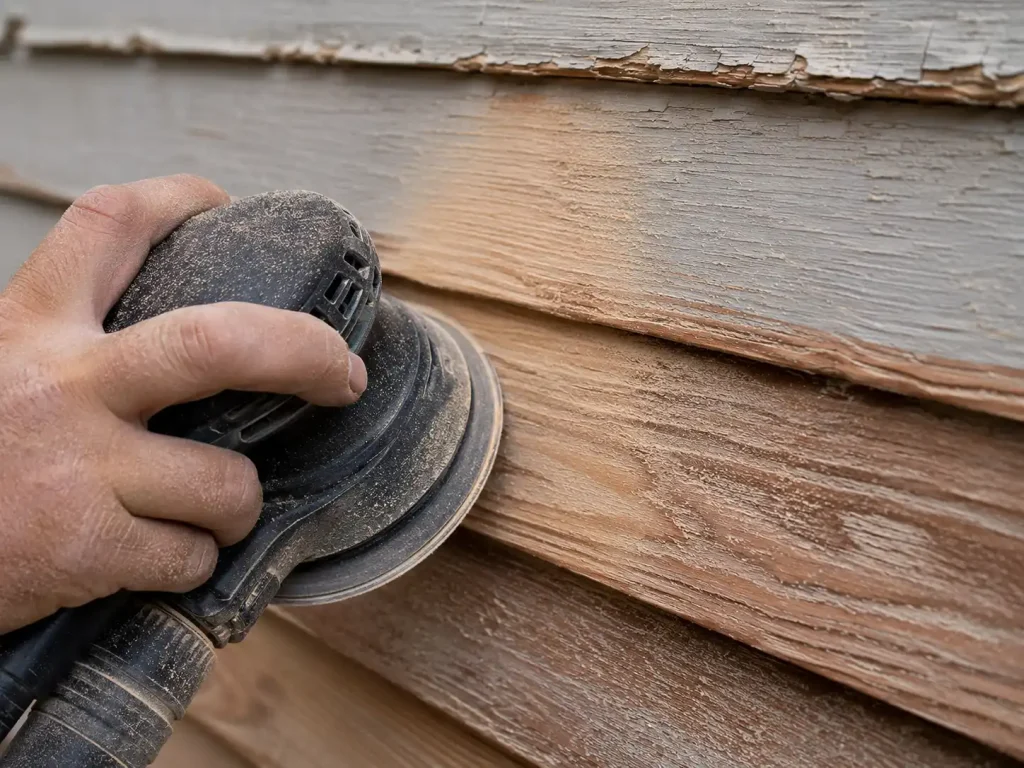
Focus on sanding:
- Scraped paint edges
- Rough cedar grain
- Weathered wood fibers
- Glossy old paint
- Splintered areas
- Trim edges and corners
- Areas where bare cedar is exposed
Use medium-grit sandpaper for rough sections, then use a finer grit where needed to smooth the surface. Avoid over-sanding cedar aggressively, especially on older or softer boards.
After sanding, remove dust with a brush, clean cloth, or blower before moving to the cleaning stage.
Phase 3: Deep Clean the Cedar Siding
Once loose paint and rough areas are addressed, the siding needs to be cleaned. Cedar can collect dirt, pollen, mildew, algae, dust, and airborne pollutants. These contaminants can stop primer and paint from bonding properly.
For most cedar siding, use:
- A garden hose
- Soft-bristle brush
- Mild exterior wood cleaner
- Bucket of water
- Sponge or cloth
- Scraper for stubborn buildup
Start at the top and work downward. Scrub with the direction of the wood grain and rinse thoroughly.
If mildew is present, it should be killed and removed before painting. Painting over mildew does not solve the problem; it can continue to grow under the coating and stain the new finish.
Can You Pressure Wash Cedar Siding Before Painting?
Pressure washing can be used carefully, but cedar is a soft wood and can be damaged by too much pressure.
If you use a pressure washer:
- Use low pressure
- Use a wide-angle fan tip
- Keep the nozzle moving
- Stay a safe distance from the siding
- Never spray upward under lap joints
- Avoid aggressive nozzles
- Let the siding dry completely afterward
For older cedar siding, hand washing is often safer than pressure washing. The goal is to clean the surface, not force water behind the siding or damage the wood grain.
Phase 4: Let the Cedar Siding Dry Completely
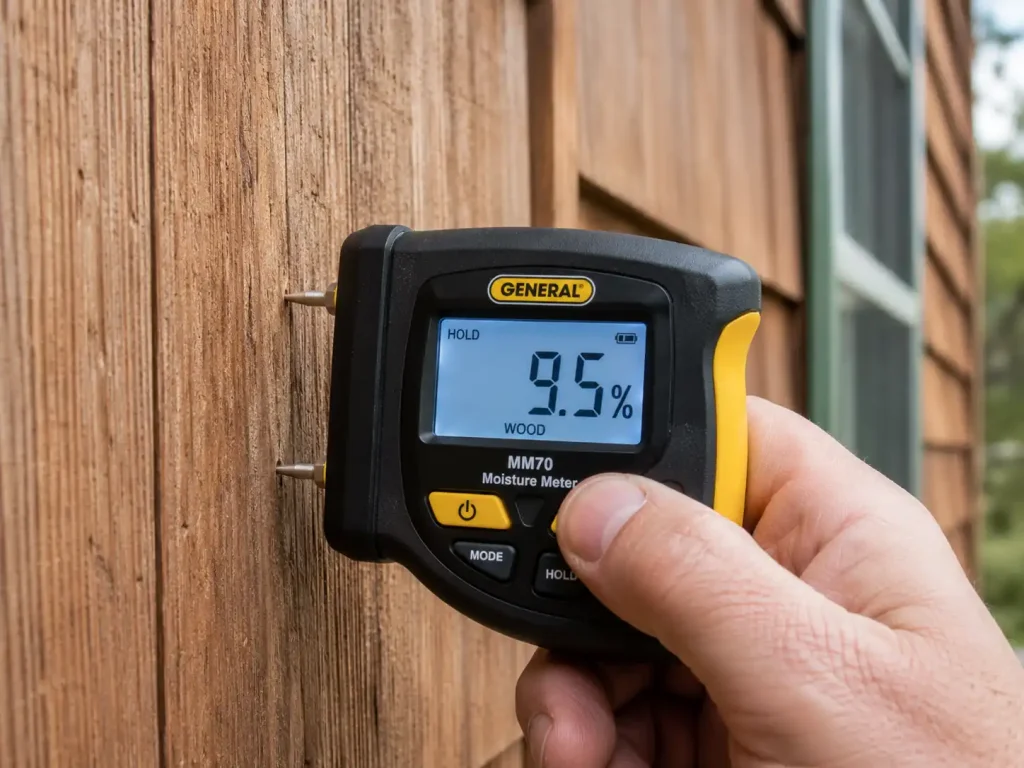
Moisture is one of the biggest causes of exterior paint failure. Cedar may look dry on the surface while still holding moisture inside the wood. If paint is applied too soon, trapped moisture can turn into vapor and push against the coating.
That pressure can cause blistering, bubbling, and peeling. This is one of the common reasons paint peels on cedar siding.
After washing or heavy rain, allow the siding to dry fully before applying primer or paint. In many cases, cedar needs several dry days to reach a safe moisture level, especially in shaded areas or humid weather.
For best results, use a moisture meter and test multiple areas, including:
- Shaded walls
- Lower siding boards
- Areas near landscaping
- Corners and joints
- Sections under rooflines
- Previously stained or peeling areas
A commonly recommended target is below 12% moisture content before priming or painting.
Phase 5: Check for Tannin Bleed Risk
Cedar contains natural tannins that can rise through paint and create yellow, brown, or reddish stains on the surface. This is especially common when bare cedar is painted without the right stain-blocking primer.
Before priming, look for:
- Dark streaks
- Water stains
- Knots
- Brown or reddish discoloration
- Previously stained areas
- Bare cedar patches
These spots should be cleaned, dried, and sealed properly before the finish coat is applied.
If your siding already has discoloration, read this guide on how to fix tannin bleed on cedar siding before applying new paint.
Phase 6: Repair Damaged Cedar Boards
Paint should never be used to hide damaged wood. If the cedar siding is cracked, loose, rotten, or soft, repairs should be completed before primer is applied.
Inspect the siding for:
- Rotted boards
- Cracks or splits
- Loose siding pieces
- Nail pops
- Deep gouges
- Insect damage
- Water-damaged areas
- Failed trim joints
Small surface cracks or nail holes may be filled with an exterior-grade wood filler. Larger damage, soft wood, or rotten boards should be replaced rather than patched.
If moisture caused the damage, fix the source before painting. Otherwise, the new coating may fail again.
Phase 7: Reset Nails and Seal Problem Areas
Loose or exposed nails can create future problems. Inspect the siding for nail pops and reset them carefully. If nails need replacement, use corrosion-resistant exterior nails to help prevent dark rust stains.
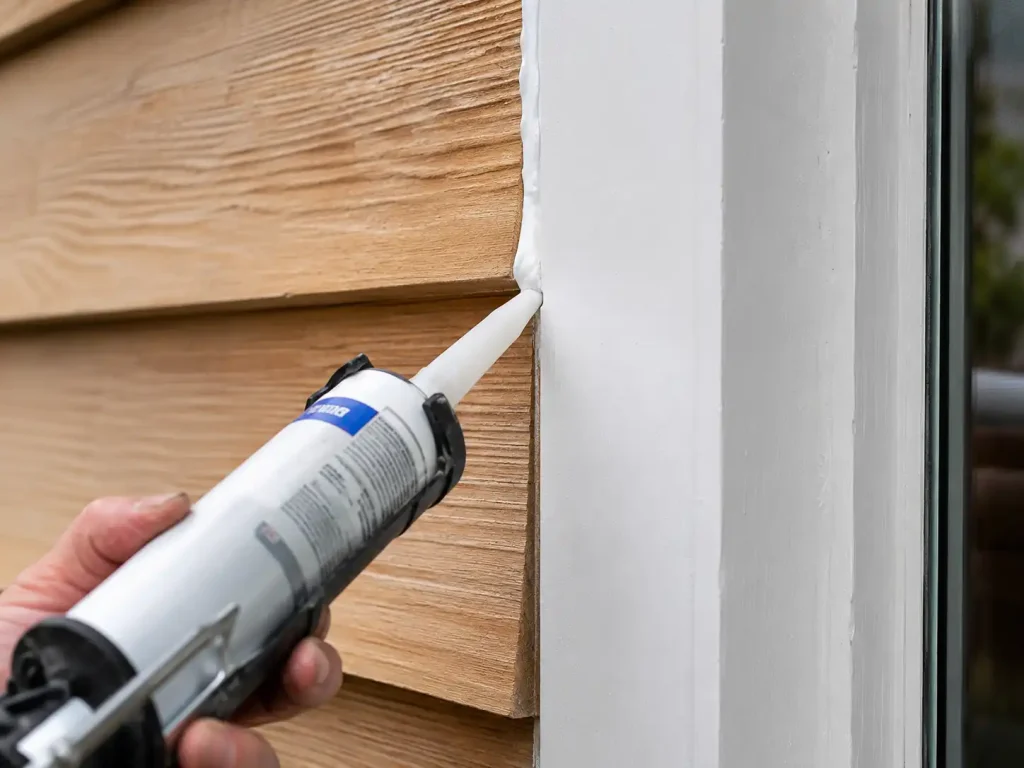
Next, inspect the caulking around joints and trim.
Check these areas:
- Window trim
- Door trim
- Corner boards
- Butt joints
- Utility penetrations
- Fascia connections
- Siding-to-trim transitions
Remove failed or cracked caulk and replace it with high-quality exterior paintable caulk. Do not caulk areas that are designed to drain or breathe, such as the bottom edges of lap siding.
Proper caulking helps block wind-driven moisture, but over-caulking can trap moisture where it should escape.
Phase 8: Prime Bare Cedar and Problem Areas
Primer is a critical step when preparing cedar siding for paint. Bare cedar, sanded spots, scraped areas, and stained sections should be primed before the finish coat.
A good primer helps:
- Improve paint adhesion
- Seal bare wood
- Reduce tannin bleed
- Create an even surface
- Improve topcoat coverage
- Reduce peeling risk
Bare cedar usually needs a stain-blocking exterior primer before painting. If only small areas were scraped down to bare wood, spot-prime those areas. If most of the siding is bare or heavily weathered, a full primer coat may be needed.
After prep is complete, choose a coating designed for exterior wood. For product selection, see this guide on the best exterior paint for cedar siding.
Phase 9: Choose the Right Weather Window
Even perfectly prepped cedar can fail if it is painted in poor weather. Temperature, humidity, sun exposure, and rain all affect drying and adhesion.
Avoid painting when:
- Rain is expected soon
- The siding is damp
- Humidity is very high
- The surface is too hot from direct sun
- Temperatures are too low
- Heavy wind is blowing dust or debris
- Morning dew has not dried
Mild, dry weather is best. Try to work when the siding is dry, the temperature is stable, and there is no rain in the forecast.
Prep Checklist Before Painting Cedar Siding
Before painting, make sure each step is complete:
- Loose paint has been scraped
- Rough areas have been sanded
- Dirt, mildew, and dust have been cleaned
- The siding is fully dry
- Moisture levels have been checked
- Damaged boards have been repaired or replaced
- Nails have been reset
- Failed caulk has been removed and replaced
- Tannin-prone areas have been identified
- Bare cedar has been primed
- The weather is suitable for painting
If all of these steps are complete, your cedar siding is ready for primer and paint.
Should You Paint or Stain After Prepping Cedar Siding?
Once the siding is clean and repaired, you may still need to decide between paint and stain.
Paint provides stronger color coverage and hides more of the wood grain. Stain allows more of cedar’s natural texture to show through and can be easier to maintain in some cases.
If you are still deciding between both finishes, compare wood stain vs. paint for cedar siding before choosing your final coating.
How Prep Work Affects Project Cost
The amount of preparation needed can affect the total cost of painting cedar siding. A home with clean, solid siding will usually require less labor than one with peeling paint, mildew, failed caulk, or damaged boards.
Prep work may increase cost when the project requires:
- Heavy scraping
- Extensive sanding
- Mildew treatment
- Wood repairs
- Board replacement
- Full priming
- Detailed caulking
- Lead paint precautions
- Multiple coats
For a full pricing breakdown, see this guide on how much it costs to paint cedar siding.
Final Thoughts
Prepping cedar siding before painting is not a step to rush. A clean, dry, smooth, repaired, and properly primed surface gives paint the best chance to bond and last.
Start by removing loose paint, sanding rough areas, cleaning the siding, checking moisture, repairing damage, sealing vulnerable joints, and priming bare cedar. When the prep work is done correctly, the final paint job will look better, perform better, and protect the cedar siding for longer.
Do you have to sand cedar siding before painting?
You do not always need to sand the entire surface, but you should sand scraped edges, rough areas, glossy old paint, and weathered wood fibers. Sanding helps primer and paint bond better.
Should cedar siding be washed before painting?
Yes. Cedar siding should be cleaned before painting to remove dirt, mildew, pollen, dust, and old surface residue. Paint should only be applied to a clean, dry surface.
Can you paint cedar siding without primer?
It is not recommended. Cedar should usually be primed before painting, especially if the wood is bare, weathered, stained, or prone to tannin bleed.
How long should cedar siding dry before painting?
Cedar siding should dry completely before painting. After washing or rain, it may need several dry days, depending on humidity, shade, temperature, and wood condition.
What happens if you paint wet cedar siding?
Painting wet cedar can trap moisture under the coating. This may cause bubbling, blistering, peeling, mildew, or early paint failure.
Do you need to remove all old paint from cedar siding?
No. You only need to remove loose, peeling, or failing paint. Paint that is still firmly bonded can usually remain after cleaning, sanding, and priming the exposed areas.
