Removing wall trim might seem simple, but if done incorrectly, it can tear drywall, crack trim, and create extra repair work. Whether you’re replacing baseboards, installing new flooring, repainting walls, or renovating a room, knowing how to remove trim from wall properly can save time, money, and frustration.
This complete guide walks you through the correct tools, methods, mistakes to avoid, and professional techniques to remove trim cleanly and safely.
Short Answer – How to Remove Trim from Wall Quickly
To remove trim from a wall quickly and safely:
- Use a utility knife to cut the caulk and paint seal.
- Insert a putty knife behind the trim to protect the wall.
- Place a pry bar over the putty knife and gently pry.
- Work slowly along the trim instead of pulling from one spot.
- Remove nails from the trim instead of pulling them through the wall.
- Patch drywall and sand after removal.
This method works for baseboards, door trim, window trim, and crown molding.
Understanding Wall Trim Before Removal
Before you start removing trim, it’s important to understand the different types of trim and why proper removal matters.
Types of Wall Trim You Might Remove
Common trim types include:
- Baseboards
- Door casing
- Window casing
- Crown molding
- Chair rail
- Quarter round / shoe molding
Each type is installed slightly differently, but the removal process is mostly the same.
Why Removing Trim Correctly Matters
Removing trim carefully is important because it:
- Prevents drywall tearing
- Avoids cracking trim if you want to reuse it
- Reduces wall repair work
- Keeps edges clean for repainting
- Saves time during renovation
Many people damage their walls simply because they skip cutting the caulk or pry too aggressively.
Tools Needed for Trim Removal
Using the right tools makes a huge difference when removing trim.
Essential Tools List
You should have these tools before starting:
- Utility knife
- Putty knife
- Pry bar
- Hammer
- Needle nose pliers
- Painter’s tape
- Wood shims
- Stud finder
Optional Tools That Make the Job Easier
These tools are helpful but not required:
- Oscillating multi-tool
- Nail puller
- Heat gun
- Trim removal tool
Professional contractors often use trim puller tools because they distribute pressure evenly and prevent wall damage.
How to Remove Trim from Wall Without Damage
This is the safest and most recommended method.
Step 1 – Score the Caulk and Paint Seal
Use a utility knife to cut along the top edge of the trim where it meets the wall.
This step is critical because paint and caulk act like glue and can tear drywall if not cut first.
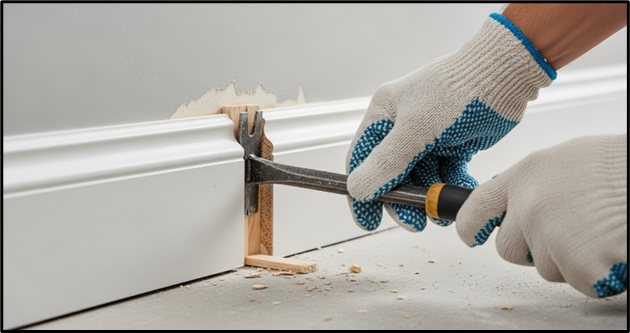
Step 2 – Insert Putty Knife Behind Trim
Slide a putty knife between the wall and trim to protect the drywall surface.
Step 3 – Pry Gently Using Pry Bar
Place the pry bar over the putty knife and gently pull outward.
Do not force it — slow pressure is the key.
Step 4 – Work Along the Trim Slowly
Move a few inches at a time along the trim instead of pulling from one spot.
This prevents the trim from cracking.
Step 5 – Remove Nails From Trim
Once the trim is removed, pull nails out from the back of the trim using pliers.
Do NOT pull nails through the front — this can damage the trim.
Step 6 – Label Trim Pieces for Reinstallation
If you plan to reuse the trim, label each piece (e.g., “Left Door,” “Window Top”).
Step 7 – Patch and Repair Wall Surface
After removal:
- Fill nail holes
- Repair torn drywall paper
- Sand smooth
- Repaint if necessary
Different Trim Removal Methods
| Method | Best For | Difficulty | Wall Damage Risk | Trim Reusable |
| Pry Bar Method | Baseboards | Easy | Low | Yes |
| Oscillating Tool | Door Trim | Medium | Low | Yes |
| Hammer Pull Method | Old Trim | Easy | High | No |
| Heat Gun Method | Painted Trim | Medium | Very Low | Yes |
| Trim Puller Tool | All Trim Types | Easy | Very Low | Yes |
The trim puller tool is generally the safest method if you want to avoid wall damage.
How to Remove Different Types of Trim
How to Remove Baseboards
Baseboards are usually nailed into studs.
Cut the caulk line, insert putty knife, then pry slowly along the board.
How to Remove Door Trim
Door trim often has more nails than baseboards.
Start prying from the bottom and work upward.
How to Remove Window Trim
Window trim may also be caulked heavily.
Score all edges before prying.
How to Remove Crown Molding
Crown molding is attached to both wall and ceiling.
Remove slowly and support the molding while prying to prevent snapping.
How to Remove Quarter Round Molding
Quarter round is usually attached only to the baseboard, not the wall.
Use a putty knife and gently pry outward.
Common Mistakes When Removing Trim
Avoid these common mistakes:
- Not cutting caulk first
- Pry from one spot only
- Pulling nails through drywall
- Using too much force
- Not protecting wall with putty knife
- Removing trim too fast
- Not labeling trim pieces
Most drywall damage happens because people rush the process.
How to Remove Trim Without Damaging Drywall
How to Remove Trim from Wall Without Breaking It
Use a trim puller or wide pry bar and apply pressure evenly across the trim instead of one point.
How to Remove Trim from Wall Without Pry Bar
If you don’t have a pry bar:
- Use a stiff putty knife
- Use a flat screwdriver carefully
- Tap gently with a hammer
How to Remove Trim from Wall for Reuse
To reuse trim:
- Score caulk carefully
- Pry slowly
- Remove nails from the back
- Store trim flat to prevent warping
Wall Repair After Removing Trim
After trim removal, you may need minor wall repairs.
Filling Nail Holes
Use spackling or joint compound to fill holes, then sand smooth.
Repairing Torn Drywall Paper
If drywall paper tears:
- Cut loose paper
- Apply joint compound
- Sand after drying
Sanding and Repainting Wall
Sand the wall smooth and repaint for a clean finish.
Preparing Wall for New Trim Installation
Before installing new trim:
- Ensure wall is smooth
- Mark studs
- Prime repaired areas
For trim installation and hardwood finishing projects, many professionals recommend quality materials like those available at National Hardwood for better durability and finish results.
FAQs – How to Remove Trim from Wall
Can you remove trim without damaging drywall?
Yes, if you cut the caulk first and use a putty knife with a pry bar, drywall damage can be minimized.
What tool is best for removing trim?
A trim puller tool or pry bar with a putty knife is the best combination.
How do you remove glued trim from wall?
Use a heat gun to soften adhesive, then pry slowly with a putty knife and pry bar.
Can you reuse trim after removing it?
Yes, if removed carefully and nails are pulled from the back.
How long does it take to remove wall trim?
A typical room takes 1–2 hours depending on trim size and installation.
Do you remove baseboards before flooring?
Yes, baseboards are usually removed before installing new flooring for a cleaner finish.
How do you remove trim nails from wall?
Use pliers to pull nails from the back side of the trim instead of pulling them through the front.
Should I cut caulk before removing trim?
Yes, always cut caulk and paint lines before prying trim to prevent drywall tearing.
Conclusion – Best Way to Remove Trim from Wall Safely
The best way to remove trim from a wall is to work slowly, cut the caulk first, and use a putty knife with a pry bar to protect the drywall. Never rush the process or pull trim from one spot, as this is the main cause of wall damage.
Quick recap:
- Cut caulk and paint seal
- Use putty knife to protect wall
- Pry slowly along trim
- Remove nails from trim
- Patch and sand wall after removal
If you follow these steps carefully, you can remove baseboards, door trim, window trim, or crown molding without damaging drywall and even reuse the trim if needed.
Removing trim properly is a small skill that makes a big difference in any renovation or remodeling project.
