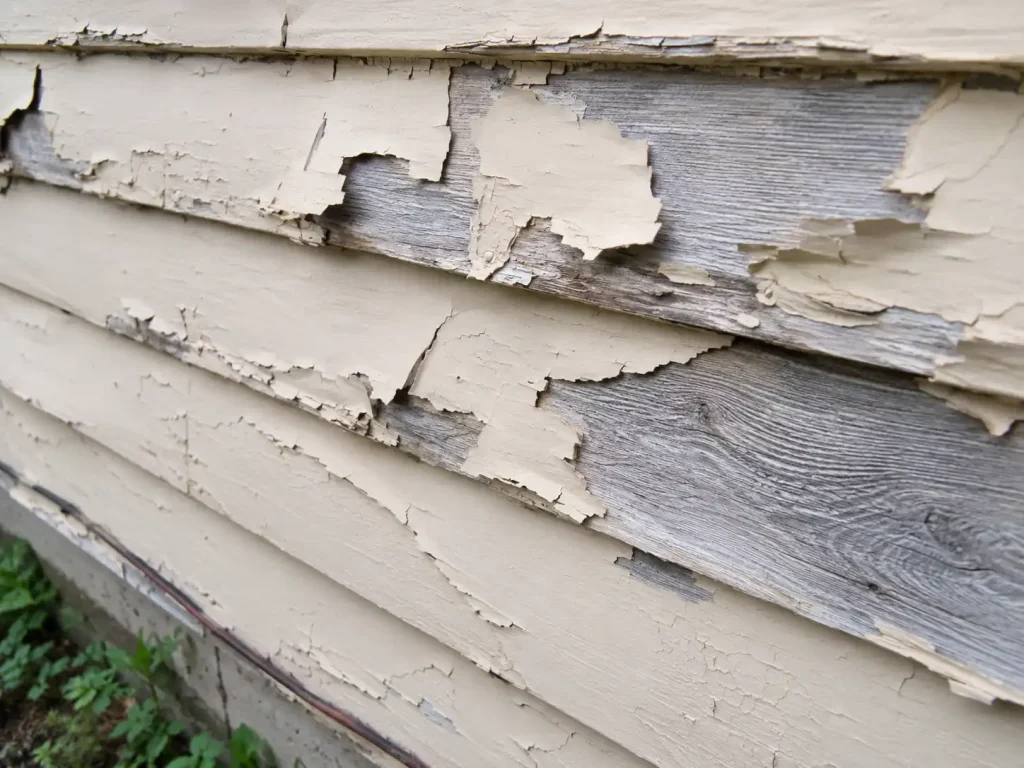
Finding sheets of peeling, bubbling, or cracking paint on your home’s exterior can be frustrating. Cedar siding is a premium wood cladding choice, and when it is painted correctly, the finish should hold up for years. So when large flakes of paint begin lifting away early, it usually means something has gone wrong beneath the surface coating.
Many homeowners assume peeling paint is caused by a bad paint product. Sometimes product quality matters, but paint formulation is not always the main culprit. Cedar is a natural, porous softwood. It expands, contracts, absorbs moisture, releases vapor, and reacts to temperature and humidity changes. If the coating system cannot handle those conditions, the paint film can lose its grip.
To fix peeling cedar siding properly, you have to look beyond a quick cosmetic touch-up. The real goal is to find out why the coating failed, remove unstable paint, correct moisture problems, stabilize the wood surface, and repaint with the right primer and topcoat system.
If you are planning a full repaint, start with the main guide on painting cedar wood siding to understand how cedar reacts to primer, paint, moisture, and weather.
Why Paint Peels on Cedar Siding
Paint peels when the bond between the coating and the cedar surface breaks. On cedar siding, that bond can fail because of moisture, poor surface preparation, mill glaze, wrong primer, incompatible coatings, thick old paint buildup, or weather-damaged wood fibers.
Peeling is usually not random. The location, pattern, and condition of the exposed wood often reveal what caused the failure.
Common signs include:
- Large brittle paint flakes lifting from the siding panels
- Blisters or bubbles under the paint film layer
- Cracks forming across old paint layers
- Bare gray cedar exposed beneath the coating film
- Peeling concentrated near windows, trim casings, or rooflines
- Paint lifting around knots, seams, or nail holes
- Repeated peeling failure on the exact same wall section
- Peeling mostly on intense sun-exposed walls
- Paint failure near lower siding boards or damp soil areas
Before repainting, inspect the failure pattern carefully. A wall peeling near gutters may have a moisture issue. A newly painted wall peeling evenly may have a prep or primer issue. A very old painted wall cracking in thick layers may have a buildup problem.
Cause 1: Trapped Internal Moisture
Moisture is one of the most common causes of paint peeling on cedar siding. Cedar absorbs water from rain, dew, humidity, pressure washing, leaks, and even moisture moving from inside the home.
When damp cedar heats up in the sun, moisture inside the wood can turn into vapor. As that vapor tries to escape, it pushes against the paint film. If the pressure is stronger than the adhesion bond, the paint begins to blister, bubble, or peel away.
Moisture may come from:
- Rain entering through open structural joints
- Leaking gutters or overflowing downspouts
- Failed caulk around windows and door trim
- Roof or flashing leaks
- Sprinklers hitting the siding directly
- Damp insulation behind the wall framing
- Poor internal wall ventilation
- Pressure washing too aggressively
- Painting before the cedar dried fully
- Water trapped behind old paint layers
This type of peeling often appears as bubbles first. Later, those bubbles crack and turn into peeling flakes. The fix is not just repainting. The moisture source must be corrected first. If water continues to enter the siding, even a high-quality paint system may fail again jaisa ke humne zikr kiya tha.
Cause 2: Painting Cedar Before It Is Dry
Cedar can feel dry on the outside while still holding moisture inside. This is especially common after rain, washing, heavy humidity, or pressure washing.
If primer or paint is applied too soon, the coating can trap moisture inside the wood. Once the sun warms the wall, vapor pressure builds under the coating and causes blistering or peeling.
This problem is common when:
- The siding was washed and painted too soon
- A heavily shaded wall did not dry fully
- Lower boards held structural moisture longer
- Rain occurred shortly before painting window or trim areas
- The wood was painted during highly humid weather
- No moisture meter was used before coating raw boards
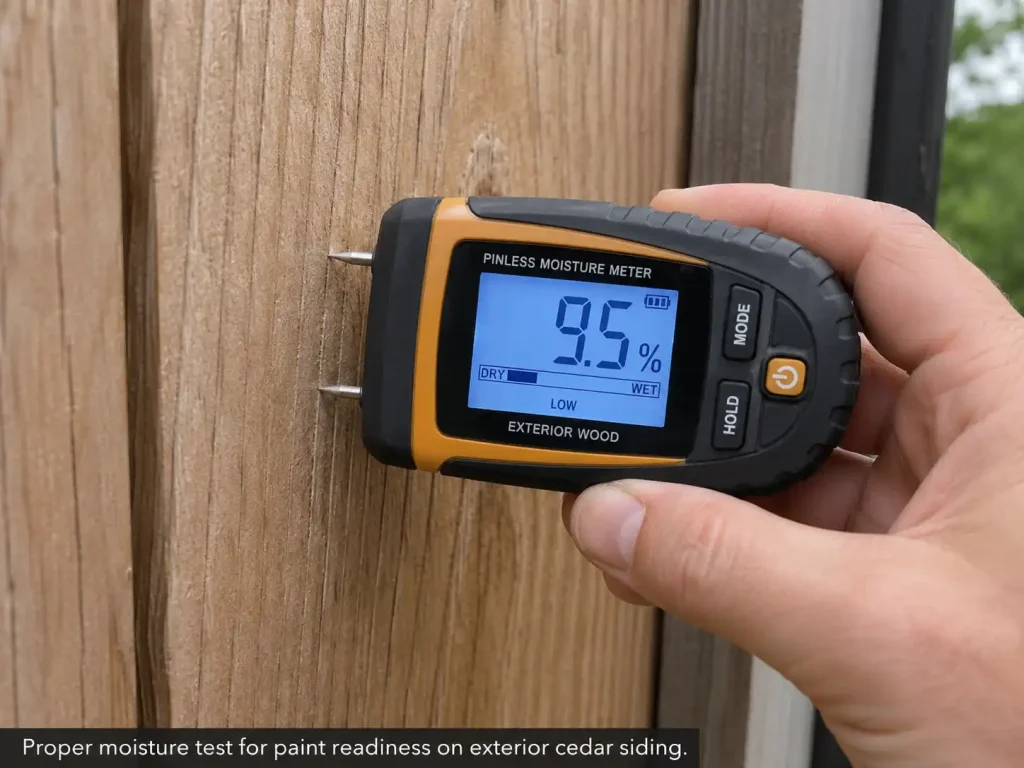
A pin-type moisture meter is highly useful before painting cedar. A commonly recommended target is below 12% moisture content before primer or paint is applied. For the full surface preparation workflow, see how to prep cedar siding before painting.
Cause 3: Mill Glaze on New Cedar
Mill glaze is a slick, shiny, compressed surface layer that can form when cedar boards are processed at the mill. High-speed planing can heat and compress the wood surface, sometimes drawing natural resins and extractives upward. The result is a hard, smooth surface that does not absorb primer well.
If primer is applied directly over mill glaze, it may sit on top of the surface instead of bonding deeply into the wood fibers. The paint may look good at first, but the coating can fail within a few seasons because it never had a strong mechanical grip.
Signs of possible mill glaze include:
- New cedar planks feel unusually smooth or slick
- Liquid water beads on raw wood instead of absorbing slightly
- Primer does not soak or grip evenly into the timber
- Peeling appears across recently installed wood boards
- Coating failure happens significantly sooner than expected
The fix is usually sanding or scuffing the surface thoroughly before priming. This breaks the glazed layer and opens the wood fibers so the primer can bond better.
Cause 4: Poor Surface Preparation
Paint needs a clean, dry, stable surface. If cedar siding is dirty, dusty, glossy, moldy, chalky, or covered with loose old paint, the new coating may not bond properly.
Poor preparation can include:
- Painting over structural dirt or pollen
- Painting over live mildew or algae spores
- Leaving fine sanding dust on the wall surface
- Skipping deep scraping steps completely
- Not feather-sanding old paint edges smooth
- Painting over glossy, slick old coatings
- Ignoring cracked exterior caulk joints
- Painting over soft or damaged wood boards
- Not removing loose paint completely down to a sound edge
This is why peeling often appears soon after a repaint. The new paint did not fail on its own; it was applied over a surface substrate that was already unstable. The repair starts by removing failing material and stabilizing the cedar underneath.
Cause 5: Missing or Incompatible Primer
Bare cedar usually needs a dedicated exterior wood primer before paint. Skipping primer can lead to weak adhesion, uneven absorption, tannin staining, and early coating failure.
Raw cedar absorbs the binders and solvents from paint unevenly. When this happens, the paint film may dry weaker than it should. Instead of forming a strong bond, it can become thin, patchy, or poorly attached to the surface.
Primer helps:
- Seal porous bare cedar pores
- Improve paint adhesion mechanically
- Create a stable chemical base coat
- Reduce uneven paint absorption across walls
- Help the final topcoat cover better with fewer layers
- Reduce rapid tannin bleed risks
- Protect exposed wood fibers from degrading
Primer selection also matters immensely. A basic primer may not perform well on cedar if the wood is tannin-prone, weathered, damp, or heavily scraped. If your peeling paint also has yellow, brown, or tea-colored staining, review our troubleshooting steps on how to fix tannin bleed on cedar siding before repainting.
Cause 6: Thick Old Paint Buildup
Older homes may have several layers of paint built up over decades. Each new coat adds weight and thickness. Over time, the entire coating film becomes less flexible.
Cedar moves continuously with seasonal humidity and temperature changes. Thick, rigid paint layers may no longer stretch with the wood. When the siding expands and contracts, the old coating can crack, shear, and peel away in large flakes.
This type of failure often looks like:
- Thick paint chips with multiple old colors visible underneath
- Cracked alligator-like paint patterns across the wall panels
- Large heavy sheets peeling cleanly from the wall structure
- Paint lifting all the way down to old base layers or bare wood
- Brittle flakes that snap or break easily when bent
When buildup is severe, simple spot repairs are not enough. Large wall sections may need more aggressive scraping, sanding, or complete stripping before repainting.
Cause 7: Weathered Gray Wood Fibers
Cedar left exposed to sunlight and outdoor weather can develop a gray, dry, powdery surface texture. UV exposure breaks down the lignin that holds surface wood cells together.
If primer is applied over this degraded layer, it will bond to weak surface fibers instead of solid wood. Later, the weakened fibers release from the board, and the paint layer comes off with them. This is why weathered cedar should be cleaned and sanded back to a stable surface before priming.
Signs of weathered wood fiber failure include:
- Gray bare wood showing clearly under peeling paint flakes
- A fuzzy or powdery wood surface texture
- Paint peeling with loose wood fibers attached to the back of the chip
- Poor paint adhesion on high sun-exposure walls
- Highly uneven primer absorption across the timber panels
The goal is to remove unstable gray fibers and expose fresh, sound cedar before applying primer.
Cause 8: Paint Applied Over Stained Cedar Incorrectly
Paint can peel when applied over stained cedar if the old stain is oily, glossy, dirty, damp, or chemically incompatible with the new coating system.
This is highly common when homeowners try to paint over:
- Old oil-based transparent or semi-transparent stains
- Glossy, slick solid stains
- Semi-transparent stains with heavy waxy residue
- Weathered stain that was not cleaned of mildew and dirt
- Stained siding that was not sealed with a stain-blocking primer first
Before painting over stained cedar, the surface must be thoroughly cleaned, dried, sanded where needed, and sealed with a compatible primer. For the full process, read our dedicated breakdown: can you paint over stained cedar siding.
Cause 9: Failed Caulking and Open Joints
Caulk failure can allow wind-driven water to enter behind the siding panels. Once moisture gets behind the paint film, peeling can begin.
Carefully check areas around:
- Window trim and door casings
- Corner boards and siding butt joints
- Utility openings and penetrations
- Roofline transitions and fascia connections
- Exposed nail holes
Cracked, missing, or separated caulk should be completely removed and replaced with high-quality exterior paintable caulk where appropriate. However, do not caulk areas designed to drain or breathe naturally, such as the bottom horizontal edges of lap siding. Blocking drainage paths traps moisture and makes peeling worse.
Cause 10: Painting in Poor Weather Conditions
Even if the siding is properly prepared, poor weather during paint application can disrupt the drying process. Paint may fail if applied during:
- High humidity or thick morning dew
- Extreme heat or direct, blinding harsh sun exposure
- Cold temperatures (below 50°F)
- Rainy or threatening weather conditions
- Heavy wind that blows dust and debris onto wet paint
- Rapid temperature drops late in the afternoon
Paint requires the right climatic conditions to form a proper, uniform film. If it dries too fast, too slowly, or unevenly, topcoat adhesion and durability will suffer.
How to Diagnose the Cause of Peeling Paint
Before fixing peeling paint, look closely at where and how the paint is failing:
- Peeling Near the Bottom Boards: This often points to moisture from landscaping, sprinklers, splashback, poor drainage, or damp soil near the wall foundation.
- Peeling Around Windows and Trim: This indicates failed caulk, water entry points, or poor sealing around trim joints.
- Peeling on Sunny Walls: Strong UV sun exposure stresses old coatings and dries out wood fibers. South and west-facing walls often fail first.
- Peeling in Large Sheets: This usually means poor adhesion, high moisture vapor pressure, old paint buildup, or missed primer layers.
- Peeling Around Knots: This involves natural wood tannins, sap resins, or poor spot-priming steps.
- Peeling Soon After Repainting: This points directly to prep failure, damp wood cells, incompatible primer, or painting over unstable old coatings.
This diagnosis step matters because each core cause requires a different repair strategy.
How to Fix Peeling Paint on Cedar Siding
To repair peeling cedar siding properly, you need to remove the failed coating, correct the root cause, prepare the wood, prime exposed areas, and repaint under the right conditions.
Step 1: Stop Moisture Problems First
Before scraping or sanding, fix water sources that may be causing the paint to fail. Check and correct leaking gutters, overflowing downspouts, sprinklers hitting the siding, failed caulk lines, roof flashing problems, water pooling near the wall, damp vegetation resting against siding panels, or poor ventilation behind the siding. Paint cannot fix water intrusion; if moisture keeps entering, peeling will return.
Step 2: Remove Loose and Failing Paint
Use a sharp scraper to remove loose, curling, flaking, or bubbling paint. Work with the grain to avoid damaging the soft cedar surface. Remove paint that is lifting, cracked, brittle, hollow-sounding, flaking, bubbling, or poorly bonded. You do not always need to remove every bit of old paint; sound paint that is firmly bonded can remain. But any unstable coating must be removed.
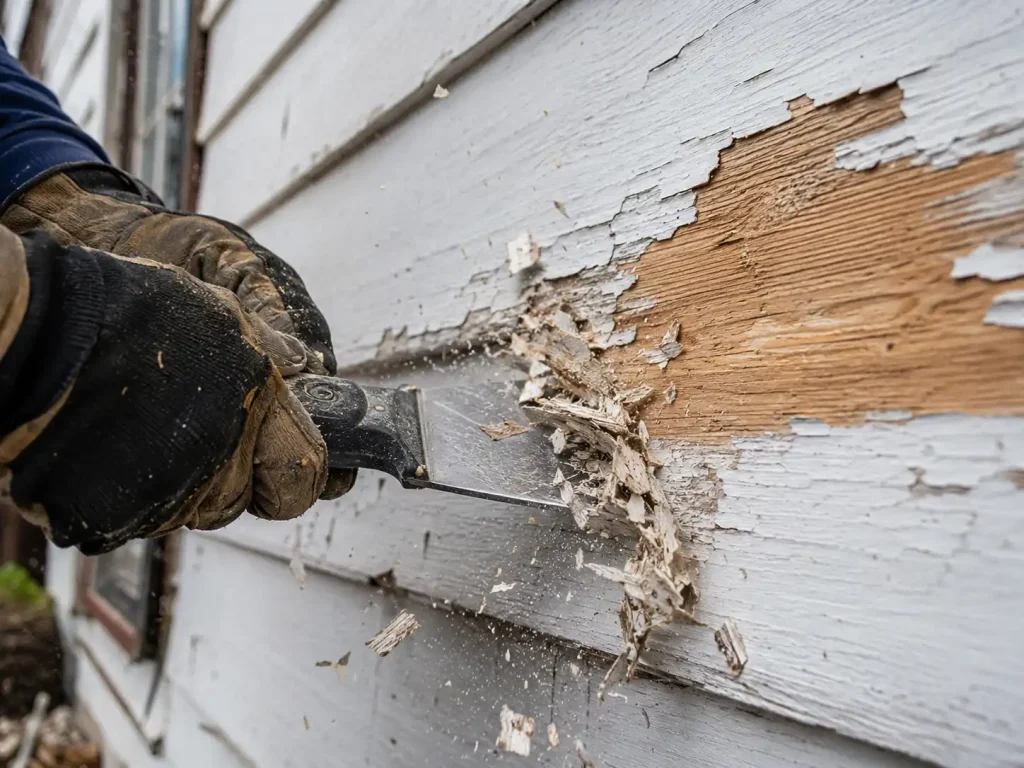
⚠️ Safety note: If the home was built before 1978, test for lead paint before scraping or sanding.
Step 3: Feather-Sand the Edges
After scraping, sand the transition where old paint meets bare wood. This is called feather sanding. It smooths the edge so the sharp repair ridge does not show through the new finish coat. Sanding also breaks mill glaze, removes gray weathered fibers, smooths rough cedar, improves primer adhesion, and dulls glossy old paint. After sanding, remove dust completely before cleaning.
Step 4: Clean the Repair Area
Scraping and sanding leave dust that can interfere with primer adhesion. Clean the area with a mild exterior wood cleaner and a soft-bristle brush to remove dirt, pollen, mildew, and chalky residue. Rinse gently with a garden hose. Avoid aggressive pressure washing because high pressure will damage cedar and force water behind the siding panels.
Step 5: Let the Cedar Dry and Test Moisture
After cleaning, allow the siding to dry completely. This step is critical. Use a moisture meter, especially on shaded walls or lower boards. A common target before coating cedar is below 12% moisture content. Do not paint if the wood feels damp, rain is expected, or moisture readings are too high. Painting damp cedar restarts the peeling cycle.
Step 6: Prime Bare Cedar and Sanded Areas
Once the wood is dry, prime all exposed cedar using an exterior primer suitable for cedar and stain blocking. Prime bare wood patches, scraped areas, sanded spots, knots, weathered sections, and discolored areas. For small repairs, spot-prime beyond the damaged area. For widespread peeling, priming full boards or full wall sections gives a more even, uniform result.
Step 7: Repaint With a Compatible Exterior Paint
After primer dries according to the product label, repaint with a high-quality exterior paint that is compatible with the primer and the existing coating. For most projects, premium exterior acrylic latex paint is a practical choice because it remains flexible and performs well on exterior wood. For paint line selection, see the guide on the best exterior paint for cedar siding.
Apply thin, even coats, avoid thick paint buildup, follow proper recoat times, work in mild weather, and repaint full boards if patching looks uneven.
When Cedar Boards Should Be Replaced
Sometimes paint peeling reveals deeper structural wood damage. If the siding itself is failing, repainting is not enough. Replace boards if they are soft, rotten, crumbling, severely cracked, warped, pulling away from the wall, or water-damaged. Paint protects sound cedar, but it cannot restore rotten or structurally damaged boards.
How to Prevent Paint From Peeling Again
After repairing the paint failure, prevention is key. To reduce future peeling:
- Keep gutters clean and redirect downspouts properly
- Stop sprinklers from hitting siding panels
- Maintain flexible caulk around trim casings
- Let cedar dry fully before painting, ensuring it passes the under-12% moisture limit
- Remove loose paint completely and sand mill glaze or weathered fibers
- Prime all bare cedar patches using compatible exterior paint systems
- Avoid thick coating layers buildup and paint only during suitable weather conditions
- Inspect your home’s siding annually to catch small failures early
Should You Repaint or Switch to Stain?
If peeling is widespread, you may wonder whether stain would be easier to maintain than paint. Stain usually fades and wears away more gradually, while paint can blister or peel when moisture and adhesion problems occur. However, switching from painted cedar back to transparent stain can be difficult because the old paint must usually be completely removed down to bare wood pores.
If you are deciding between both finish options, read our detailed comparison: wood stain vs. paint for cedar siding.
Does Peeling Paint Increase the Cost of Repainting Cedar Siding?
Yes. Peeling paint increases the cost of repainting cedar siding because it adds intensive preparation labor before a new coating can be applied. Extra cost comes from scraping loose paint, feather-sanding edges, deep cleaning, caulking repairs, full primer application, board replacement, or lead paint testing. If peeling is widespread, the project will cost much more than a simple repaint. For a full pricing breakdown, see our guide on the cost to paint cedar siding.
Common Mistakes to Avoid
- Painting Over Loose Paint: New paint will not hold if the old paint layer underneath is already failing.
- Skipping Moisture Repairs: If water is still entering the wall structure, peeling will return.
- Priming Damp Cedar: Primer will trap moisture if the wood is not dry enough, causing instant bubbles.
- Using the Wrong Primer: Bare cedar needs the right exterior wood primer designed to block tannins.
- Ignoring Mill Glaze: New cedar must be sanded or scuffed before primer can form a mechanical bond.
- Leaving Gray Wood Fibers: Weathered gray fibers should be removed down to sound wood before priming.
- Applying Paint Too Thick: Thick layers become rigid, brittle, and highly prone to cracking over time.
- Using Pressure Washing as a Paint Stripper: High pressure will gouge soft cedar and force water deep behind the boards.
Final Thoughts
Paint peels on cedar siding when the coating loses adhesion to the wood. The most common causes are trapped moisture, painting damp siding, mill glaze, poor prep, missing primer, thick old coatings, weathered wood fibers, and failed joints that let water enter.
The right fix starts with diagnosis. Find the moisture source, remove loose paint, sand the edges, clean the surface, let the cedar dry fully, prime exposed wood, and repaint with a compatible exterior coating. When the cause is corrected and the surface is stabilized, cedar siding can be repaired properly and protected for years.
FAQs About Peeling Paint on Cedar Siding
Why does paint peel on cedar siding faster than other materials?
Cedar is a porous natural softwood that expands, contracts, absorbs moisture, and releases vapor actively. If moisture enters the wood or the surface was not prepared correctly, the paint film can lose adhesion faster than it might on inert, stable manufactured materials like vinyl.
Can you paint over peeling paint on cedar siding?
No. All loose or peeling paint must be scraped away down to a sound edge first. Painting over an unstable base coat will simply pull the old layers completely off, leading to more peeling.
Does power washing remove all peeling paint from cedar?
A pressure washer may remove some loose paint, but it should not be relied on as the main removal method. Cedar is very soft, and high pressure will gouge the wood grain or force water behind the siding. Manual scraping and sanding are much safer.
What happens if I prime cedar siding while the wood is damp?
Priming damp cedar traps liquid moisture inside the wood cells. When the siding heats up in the sun, that moisture turns into expanding vapor and pushes against the coating, causing immediate blisters, bubbles, and peeling.
What is mill glaze on cedar siding?
Mill glaze is a slick or compressed surface layer that forms during manufacturing blades friction. It reduces primer penetration and causes widespread adhesion problems if not sanded or scuffed before coating.
Do I need to sand cedar siding after scraping paint?
Yes. Sanding feathers old paint edges smooth, removes rough fibers, breaks glossy or slick surfaces, and improves primer adhesion.
What primer should I use on peeling cedar siding?
Use an exterior wood primer suitable for cedar, bare wood, and stain blocking. Bare or sanded cedar patches should be spot-primed before repainting.
Is stain better than paint if cedar siding keeps peeling?
Stain is easier to maintain because it fades gradually instead of peeling. However, switching from painted cedar back to a natural stain requires extensive paint removal down to bare wood pores.
